Local Development
This guide walks you through setting up a local development environment for monetr on macOS or Linux. If you are using Windows, it is still possible to run the development environment locally. However, it is not documented at this time.
Prerequisites
At the time of writing this, monetr requires Plaid credentials for development. Among other credentials, documentation on how to retrieve them can be found here: Credentials
Clone the repository
To get started, clone the monetr repository from GitHub or from your fork.
git clone https://github.com/monetr/monetr.git
cd monetr
The rest of the commands in this guide are issued from this directory.
Dependencies
monetr does require a few tools to be installed locally in order to develop or build it. These tools are outlined below:
Required
- Node (
>= 18.0.0) - npm (
>= 8.0.0) - git (
>= 2.0.0) - Go (
>= 1.24.3) - CMake (
>= 3.23.0) - GNUMake (
>= 4.0) - gcc (
>= 12)
The tools above are the minimum tools required in order to build and work on monetr locally. But if you intend to run the complete development environment locally or if you plan on creating release builds of monetr you will also need:
Optional
- Docker (
>= 20.0.0): Docker (and Docker Compose) are used to run the local development environment for monetr, allowing you to have the entire application and all of it’s features with hot-reloading.
Mac Specific
macOS can ship with a version of make that is outdated. It is recommended that you use brew or any other preferred
method to install the most recent version of GNUMake on your Mac. This will not break anything that is already using
make, but will make sure that your version is compatible with the monetr Makefiles.
For example; you should see something like this for your make version.
make -v
# GNU Make 4.3
# Built for x86_64-apple-darwin20.1.0
# Copyright (C) 1988-2020 Free Software Foundation, Inc.
Configuration & Credentials
At the moment monetr requires at least Plaid credentials in order to run properly, even for development. You can read more about obtaining these credentials here: Credentials
The makefile will look for these development credentials and some configuration options in the following path:
$HOME/.monetr/development.envYou can create the file manually like this:
mkdir $HOME/.monetr
touch $HOME/.monetr/development.env
vim $HOME/.monetr/development.env
Once you’ve opened this file you’ll need to provide the Plaid Client ID as PLAID_CLIENT_ID and Plaid Client Secret as
PLAID_CLIENT_SECRET here.
Please do not store credentials in the project directory for monetr, it is much easier to accidentally commit secrets to git when they are in your project directory. Keeping sensitive development credentials outside of the project makes it much harder to accidentally push them to a public repository.
CMake
monetr uses CMake as the primary build system, it is also used for running the tasks for local development. If you want
to use a custom CMake configuration you can create a CMakeUserPresets.json file in the project directory (it will be
ignored by Git) and populate it with the configuration variables you want to override. If you want to always use a
specific preset when running general make targets you can create a .cmakepreset file in the project directory. Inside
that file you can put the name of the preset you want to use by default. Or you can pass CMAKE_PRESET=... when running
a make target.
CMAKE_PRESET is ignored for some make targets, such as release and test. As each of those targets have a
specific preset that they are expected to use.
Here is a sample of a user presets file with a few customized options:
{
  "version": 5,
  "cmakeMinimumRequired": {
    "major": 3,
    "minor": 23,
    "patch": 0
  },
  "configurePresets": [
    {
      "name": "developer",
      "displayName": "Developer's custom config",
      "description": "Customized configuration for developer",
      "generator": "Unix Makefiles",
      "binaryDir": "${sourceDir}/build",
      "cacheVariables": {
        "CMAKE_BUILD_TYPE": "Debug",
        "MONETR_LOCAL_DOMAIN": "monetr.local",
        "MONETR_EMAIL_VERIFICATION_ENABLED": "true",
        "MONETR_KMS_PROVIDER": "vault",
        "MONETR_STORAGE_PROVIDER": "s3",
        "MONETR_DEVELOPMENT_LITE_TARGET": "my.monetr.dev",
        "DISABLE_GO_RELOAD": "false"
      }
    }
  ],
  "buildPresets": [
    {
      "name": "developer",
      "configurePreset": "developer"
    }
  ]
}
This config specifically changes the following options:
MONETR_EMAIL_VERIFICATION_ENABLED: By setting this to true the developer is required to use the local SMTP server to verify their email address when creating a new user. Valid values aretrueorfalse.MONETR_KMS_PROVIDER: As configured, enables a local instance of Hashicorp Vault as well as configures monetr to use Vault Transit for secret encryption and decryption. Valid values areplaintext,awsorvault. Note: The AWS setting runs a local KMS service compatible with AWS KMS’s API.MONETR_STORAGE_PROVIDER: A minio instance will be run as part of the local development stack. Valid values ares3orfilesystem. When usingfilesystemuploaded files will be stored in your$PWD/build/development/storagefolder.MONETR_DEVELOPMENT_LITE_TARGET: When working on monetr’s frontend only, specify an API server that you want to use for the frontend to talk to. Requires an account on that API server.
There are other options here that will be documented later, as well as other options that have not been covered here at all, but those options are the primary ones that change the local development stack the most.
Starting It Up
With the above requirements installed. You should be able to spin up the local development environment that runs inside of Docker compose.
This command will also load any of the environment variables specified in the development env file (mentioned above)
into the monetr container where the API is running.
make developThis command may prompt you for an administrator password, this is because monetr is using mkcert and hostess to
setup TLS certificates as well as the monetr.local domain name in your /etc/hosts file.
Disabling this will be available in the future, but has been required in order to integrate with Plaid’s OAuth2 flow.
This will install node modules in the project’s directory, as well as start up the containers needed for monetr to run
locally. This command will exit automatically once all the containers are healthy. If you want to follow along while it
is starting up you can use the make logs command in another terminal inside the project directory.
Certificate Problems
If you run an issue where your browser is presenting a message like net::ERR_CERT_AUTHORITY_INVALID when trying to
navigate to https://my.monetr.local then please run the following commands in the monetr project directory.
# Removes the current mkcert certificates
sudo ./build/go/bin/mkcert -uninstall
# Reinstall the certificates without root
./build/go/bin/mkcert -install
On Linux you may also need to install libnss3-tools before running the mkcert install again.
Once you restart your browser completely, this should correct the issue.
Working
Congratulations, you should now have monetr running locally on your computer. The develop task will print out some
basic information for you. But if you missed it, you can access the development version of monetr at
https://my.monetr.local.
Almost all of monetr’s code is setup to hot-reload as you make changes. The documentation, Go code and React UI will all automatically reload as changes are made. Changes to the Go code will not invoke a browser refresh of any sort though, so to observe a new behavior in the API you will need to refresh or make the API call again.
If you want to disable hot reloading of the Go code, you can include DISABLE_GO_RELOAD=true in your env variables
when you run make develop.
Local Services
As part of the local development stack, several services are run to support monetr. These services include:
- minio As an S3 storage backend. The console is accessible via
https://s3.monetr.localwhen the local environment is running. - local-kms An AWS KMS compatible local development API. This is used for encrypting secrets in the local development environment.
- Mailpit An SMTP server that allows emails to be sent without really sending
them. This is used to validate and test communication functionality locally. This service is accessible via
https://mail.monetr.localwhen the local environment is running. - Vault Vault secret management and encryption, Transit is used by monetr for storing
secrets securely. Available at
https://vault.monetr.localif you have Vault enabled in your user preset.
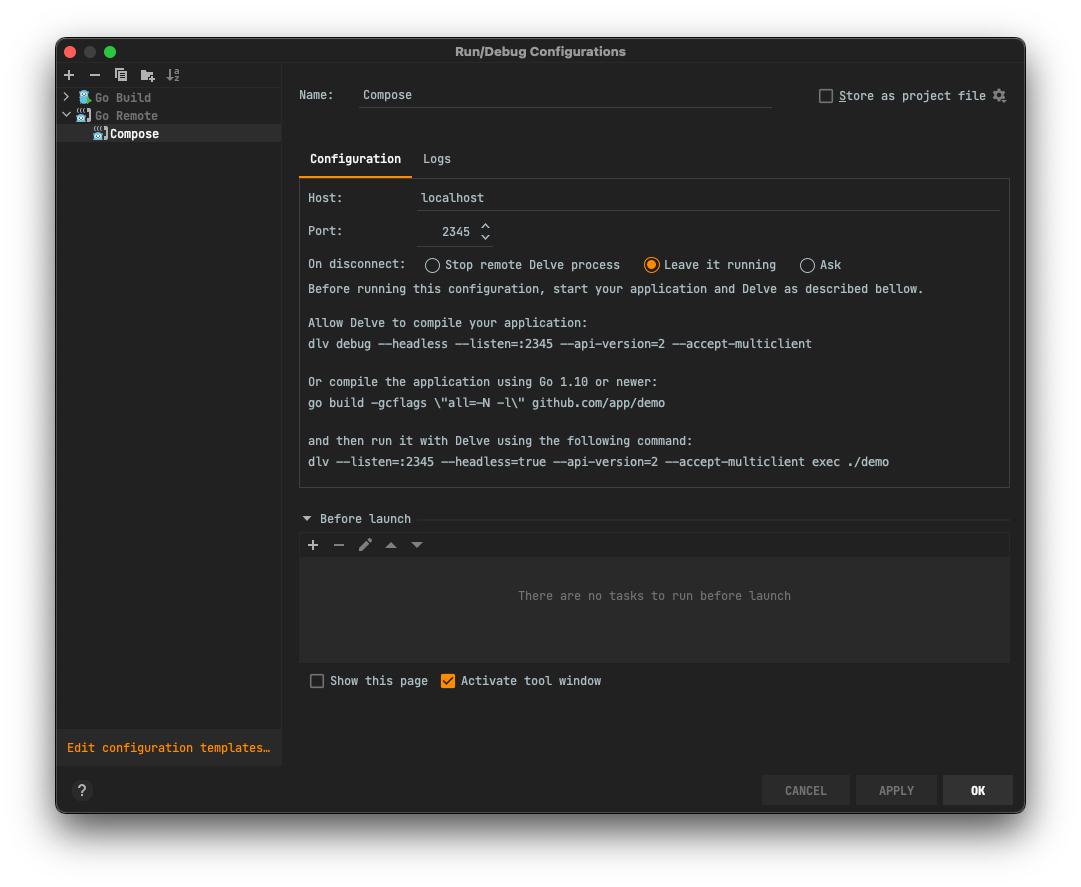
Debugging
The monetr container running the API has delve included. If you prefer to work using a step-debugger you can connect your editor to it. You will need to reconnect your editor each time it reloads, but it is very easy to make your changes and then hit debug and let your breakpoints be hit.
Delve is available via port 2345 on localhost. I’m not sure what the configuration will be for every editor to
connect to it; but this is a screenshot of IntellJ IDEA’s configuration for remote debugging.
Tests
monetr requires a PostgreSQL instance to be available for Go tests to be run. At the moment there isn’t a shorthand script to provision this instance. But an easy way to do so is this:
docker run -e POSTGRES_HOST_AUTH_METHOD=trust --name postgres --rm -d -p 5432:5432 postgres:16This will start a PostgreSQL instance in Docker (or remove an existing one) and make it available on locahost:5432 as
well as not require authentication. This makes it easy for tests to target it.
If tests are run via make then nothing more needs to be done. However, if you want to run tests directly from your
editor or other tools you will need to run the database migrations.
make migrateWill run all schema migrations on the PostgreSQL database on your localhost container.
Tests can be run using the go test CLI, or all tests can be run using:
make testStorybook
monetr now provides a storybook setup for working on UI components outside of running the entire application locally. To start storybook you can run the following command.
make develop-storybookThis will kick off the storybook development server. You can make modifications to the stories locally or components used in stories and see the changes reflected with hot-reloading.
To build the storybook as a static set of assets, you can run the following command:
make storybookThis will output the storybook assets in $PWD/build/stories/dist
Frontend
An alternative to running storybook to work on only the frontend components of monetr is to run a “lite” development environment. The lite environment only runs the frontend dev server and instead of requiring an active API server and additional services to be running locally, you can instead point the frontend at a desired API server.
To start the “lite” development environment run the following command:
make develop-liteThis will run the UI dev server locally and the frontend will be available at http://localhost:3000. You can now make
any desired changes to monetr’s frontend without needing to run all of the services monetr relies on.
This development mode defaults to monetr’s staging environment (my.monetr.dev), which while it is publicly accessible;
you are not able to create new accounts on it at this time. If you want to change the API server that the lite
development environment is using you can customize the domain name in your CMakeUserPresets.json file as noted above
in the CMake section.
Be extremely conscious about what actions you perform in the lite development environment, if you have your development environment pointed at the production instance for example; any actions you take locally will affect your real account. Any data modified or deleted will not be recoverable.
Documentation
monetr’s documentation is built using Next.js and Nextra, it can be developed locally using the following command:
make develop-docsThis will setup everything the documentation site needs and run the Next.JS development server locally, you can now make changes to the documentation and see those changes reflected in your browser.
Note: The “hero” or interface example on the documentation site’s homepage does not work in development mode.
In order to build the complete documentation site as it is hosted online you can run the follow command:
make docsThis will compile the documentation and output to $PWD/docs/out.
If you want you can then run the entire site using the command: npx http-server docs/out -c-1.
Emails
monetr’s email templates are generated using react-email. They can be found in
the emails/ directory in the project folder. These emails are compiled at build-time and include some go
templating in their output in order to be useful for the server.
In order to develop or make changes to the email templates and see your changes, you can run the following command:
make develop-emailThis will start the react email development server, allowing you to preview the email templates in your browser with some preset values (instead of the go template placeholders).
Cleaning Up
Once you have finished your work and you want to take the local development environment down you have a few options.
Shutting Down Development Environment
If you want to completely shut everything down then you can run the following command:
This will delete all of your local development data, including any Plaid links, expenses, goals, etc…
make shutdownThis removes the Plaid links that are active, takes down the Docker compose containers, removes their volumes.
Completely Clean up
If you want to completely start fresh you can run the following make task. This will shut down the local development
environment if it is running, but it will also delete any files created or generated during development. This deletes
your node_modules folder, any submodules, and generated UI code.
make cleanThis should leave the project directory in a state similar to when it was initially cloned.
Clean will not remove your CMakeUserPresets.json or .cmakepreset files.
It is recommended to run make clean before performing a git pull when working from the main branch, this way changes
in the build system or significant changes to project layout or the application will be applied properly.